It's been a busy week at the homefront and only posted one tutorial this week! This is a good one to make with the kids...a pink pig made from a water bottle and Cloud Clay.
Showing posts with label animal figures. Show all posts
Tuesday, July 24, 2012
Tutorial Tuesday 7/24
Tuesday, July 10, 2012
Tutorial Tuesday
The round-up of tutorials posted this past week at my Air-Dry Clay Tutorial Directory starts with a
Paper Mache Buffalo
and then we have 3 more:
Labels:
ADC Tutorial Directory,
animal figures,
doll or figure,
flowers,
jewelry
Tuesday, July 3, 2012
Tutorial Tuesday
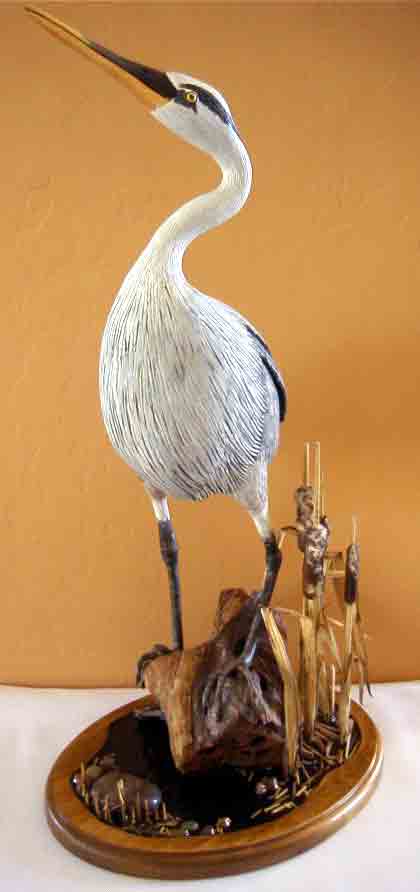
Gosh, I can't believe how fast a week can go by sometimes! It's Tuesday again and, just in case you missed one, it's time to review the new tutorials posted this past week at my Air-Dry Clay Tutorial Directory. First up we have instructions for creating a life-like Heron using gourds and paperclay. Some amazing sculptures can be created with these 2 simple materials and Phyllis Sickles shows us how.
Labels:
ADC Tutorial Directory,
animal figures,
bird,
cold porcelain,
doll or figure,
gourds,
tutorial,
Yahoo group
Tuesday, June 19, 2012
Tutorial Tuesday
![]() |
| That's me being surprised at how long it's been since last post!! |
Well, it seems I've taken a 6 month vacation from posting here at New Clay News! I didn't realize that it's been so long....my apologies, I've really been busy. Been involved in writing a book about the history of our town and spent some time in the hospital, among other things.
The book draft is now at the publisher and my health is doing OK, so maybe I can get back into playing with clay and into the old routine of posting often. Let's start with catching up on some of the newest tutorials posted over at my Air Dry Clay Tutorial Directory.
Labels:
animal figures,
beginner,
doll or figure,
flowers,
folk art,
home decor,
monkey,
roses,
tutorial
Wednesday, December 7, 2011
Make a Cute Reindeer
Today we have a video demo showing you how to create a cute little reindeer with polymer clay. But this blog is suppose to be about air-dry clay, right? It is. This demo is a good one to use as an example of how to modify a polymer clay tutorial when using air dry clay. The types of air-dry clays that work best for this sort of project are the soft, pre-colored clays such as Makin's Clay, Hearty Clay,
Labels:
air-dry-clay,
animal figures,
Christmas,
Cloud Clay,
cold porcelain,
curing,
Hearty Clay,
homemade clay,
Makin's Clay,
Model Magic,
polymer clay,
tutorial,
video-demo
Saturday, August 20, 2011
How to make a Rainbow Clay Mouse
Rainbow Clay is a new air dry modelling sculpture medium. Described as paper based modelling medium, non toxic, odourless & safe. Air drys. Lightweight, soft & easy to use. Distributed by Rainbow Clay Australia. The following video demonstrates a cute and easy mouse. Kid-friendly and a good beginners project!
(note: There's a Rainbow Clay available at Amazon.com
If you're a distributor of Rainbow Clay in the USA (or other countries), please let us know! Our Air-Dry Clay Yahoo Group has members from every continent! (Well, except Antartica maybe...LOL)
Labels:
animal figures,
beginner,
kid-friendly,
mouse,
Rainbow Clay,
video-demo
Monday, April 25, 2011
How to make a Petey Penguin Figurine
Today I'm breaking my own rule of only featuring tutorials that use air-dry clay because I wanted to share this polymer clay tutorial with you. These penguins are so darn cute and the process to make them with air-dry clay would be essentially the same as shown in this video....just don't bake it! ;-)
Deb from DebandCo.com shares with the viewers, step by step, how to make one of her famous Petey Penguin Figurines. Petey Penguin was inspired by the movie Happy Feet.
Labels:
air-dry clay,
animal figures,
penguin,
polymer clay,
video-demo
Monday, March 14, 2011
Tutorial: Make Some Funny Bunnies
Labels:
animal figures,
beginner,
bunny,
Cloud Clay,
cold porcelain,
Easter,
Hearty Clay,
kid-friendly,
Makin's Clay,
Model Magic,
video demo
Wednesday, March 9, 2011
Miniature Teddy Bear
This video demo from sugarcraft artist Aine shows us how to make a tiny miniature teddy bear. This demo is using gumpaste to create figure, but the process is exactly the same for air-dry clay. Just use regular glue where she calls for edible glue. This is a kid-friendly project and suitable for just about any clay, including the softer air-dry clays like Model Magic and Cloud Clay.
Labels:
air-dry clay,
animal figures,
beginner,
Cloud Clay,
cold porcelain,
Craft Porcelain,
kid-friendly,
miniatures,
Model Magic,
teddy bear,
video demo
Monday, February 7, 2011
How to create this puppy with Cloud Clay
Isn't that a cute face? In this video demo, Linda Peterson shows us how to create this little dog with Cloud Clay, a soft air dry clay. This would be a good cold porcelain project too, and a good beginners project!
For more information about Cloud Clay visit http://amaco.com
Labels:
air-dry clay,
animal figures,
beginner,
Cloud Clay,
dog,
tutorial,
video demo
Wednesday, February 2, 2011
Create This Pair of Lovebirds
This is a simple, beginners project and is suitable for just about any type of air-dry clay, purchased or homemade!. Spanish is the language spoken in this tutorial but each step is clearly shown and I think you can follow along even if you don't understand what she's saying!
Labels:
air-dry clay,
animal figures,
beginner,
bird,
cold porcelain,
Valentine's Day,
video demo
Wednesday, January 12, 2011
Make an Easy Owl with Model Magic
On same blog is another tutorial with a full body variation
Labels:
air-dry clay,
animal figures,
beginner,
bird,
kid-friendly,
Model Magic,
tutorial
Tuesday, December 28, 2010
How to Make a Cute Polar Bear
This video demo from Linda Peterson features a whimsical winter Polar Bear made with air-dry Cloud Clay. Cloud Clay is very soft and easy to use but dries to a hard, durable and matte finish in 24 hours or less.
Labels:
air-dry clay,
animal figures,
beginner,
Cloud Clay,
teddy bear,
tutorial,
video demo
Wednesday, October 20, 2010
Make a Miniature Seagull
Have you been thinking of making a beach-cottage dollhouse or a beach-theme diorama? This miniature seagull (1:12 scale) would be so perfect for that! This detailed step-by-step Seagull Tutorial from Lesley Shepherd at About.com suggests using air-dry Delight clay to make the bird because Delight is very lightweight when cured. Birds made with air dry clay can nest in branches or hang on tiny trees without pulling the tree branch down.
Of course, if you prefer, other brands of air-dry clay could be used....or even polymer clay! If miniatures are not your thing. I believe this seagull could be created larger using this same tutorial and still look very real!
Excuse me now, I must go and plan my miniature rustic beach cottage (with some seagulls)! I think I will make it as 3-D wall art instead of a complete house! Still planning........! ;-)
Friday, September 10, 2010
Fetcher: Figure Modeling with Hearty Clay
![]() |
| Fetcher |
Hearty Clay is soft, pliant and easy to work with. Ready to use right out of the package. Cured Hearty is lightweight, firm and a little flexible. Because this clay is very soft, it does not hold detail well when modeling. Definitely not suitable for making fine-featured dolls, but OK for whimsical figures, flowers, push molds and such.
![]() |
| #1 Armature |
Step 1 is making the armature. This figure is about 6" tall, which is large enough where it will need some support. First I made a 'stick' figure of wire. Then, to save on clay, I filled up parts of it with rolled up aluminum foil. Next, I used floral tape to wrap everything up and hold it together. I usually use white floral tape, but I happen to have a roll of brown that needed using up! Wrapping the wire with floral tape (or any tape) helps the clay stick to the armature.
![]() |
| #2 First layer of clay for 'pants' |
Photo #2 shows where I have applied the first bit of colored clay to my armature. Hearty Clay stayed moist enough to handle for quite a while, even after going thru pasta machine a dozen times to custom mix the colors I needed to match the movie character. The pants for my 'Fetcher' figure had a lot of wrinkles in the clay as I worked, so I used water to moisten and smooth the surface. But! When I wet the surface to smooth it, the color in the clay transferred to my hands.....so hand washing is important. I didn't see any color transfer on my hands from clay out-of-package, just when water was added.
![]() |
| Lots of shrinkage around tail and cracks on back of knee and elsewhere |
Twenty-four hours have gone by and my first application of Hearty Clay to the 'Fetcher' armature has dried. It has a matte suede-like appearance that looks soft but isn't. I think it's attractive. It was easy to mix the colors and easy to apply clay to the armature. The only problem I had was a lot of shrinkage and some cracking when dry. It shrank quite a bit and pulled away in the length and around the tail. Cracks are not too bad and mostly my fault for wetting surface too much when trying to smooth it. One of the reasons given for surface cracking is ..."when there is an excess of water or when there is water added on top, varying the degrees of humidity in the same mix". Well, I DID get surface pretty wet....and it DID crack...no surprise! But it looks repairable.
![]() |
| Cracks repaired. |
The photo above shows the cracks and gaps all filled in and repaired. I just took some fresh clay in the same color and blended it in. It was easy to patch and you can't even tell where the cracks used to be on back of knees. (Those cracks you see around the tail and around the waist are just rough edges.... I haven't finished that part yet!)
![]() |
| Beginning of final layers |
For the next step I added more clay for his shirt and shoes. This is just a base layer and will be built up with more clay and more detail as I work.
I found in working with Hearty Clay that building up thin layers of clay seems to work best. Hearty is very easy to work with, but thick layers of clay seem to crack. For most air-dry clays, adding clay in layers or sections seems to work the best, especially when working with an armature....but it seems especially important for the soft air dry clays like Hearty Clay. The thinner layers allow the clay to cure more evenly. Uneven curing causes cracking.
Here's the finished 'Fetcher' character! I didn't have any more trouble with cracking once I learned to limit use of water for smoothing. What looks like cracks around the sleeve and neck edge of his sweater, isn't. It's "torn". Fetcher is a pack rat and he is wearing a sweater made from a recycled argyle sock...with 'torn' edges for neck and arm holes!
Sorry, I forgot to take more photos as I was finishing his head, his sweater and other details. The main focus was to discuss Hearty Clay and I wasn't even thinking of step-by-step photos as a WIP demo! But, if you have any questions about how this was done... I'll try to answer! ;-)
Labels:
animal figures,
armature,
claymation,
Hearty Clay,
New Clay Products,
tips,
WIP
Monday, August 16, 2010
Make This Piggy Bank with Air-Dry Clay

This tutorial will show you how to make a hollow shape by forming clay around a balloon. This time will make the hollow sphere into a piggy bank.
Any brand of air-dry clay that you can roll into a flat sheet is suitable for this project. Some of the very soft marshmallow-like clays would not be a good choice because they're too sticky to roll into a sheet or to coil.
This demo shows a terra cotta colored pig, but, of course, you can use any color clay you wish. Use acrylic paints or other medium to tint your raw clay before shaping or paint the pig when cured.
Inflate a balloon to the desired size for the piglet knotting the end with adhesive tape. Roll out a circle of clay large enough to cover balloon. To get a uniform thickness to your clay when rolling, put 2 sticks on each side as a guide for roller. Either paint stir sticks or large-size craft sticks would work, depending on desired thickness of clay (and size of balloon/pig).
Cover the balloon with the flat piece of clay adapting it to the shape of the balloon. Pinch gussets along sides where needed (remove excess clay). Lightly moisten seams to blend.
Add more clay if the balloon is not properly covered. Join all the pieces well and smooth the surface. If you need to moisten to get clay to adhere to itself, be careful not to get clay TOO wet.
Form a thick coil of clay and cut 4 equal sizes for legs and feet. Moisten ends and attach to body according to photo above. Make sure your pig stands well on his own!
Shape the snout and ears with additional pieces of clay. Moisten ends and attach to body, blending edges for smooth transition into face. Poke some nostrils into snout (careful don't poke balloon yet!). Make a small coil for tail and attach to body. Curl the tail !! ;-)
To finish the piggy bank, make the money slot and burst the balloon. This should probably be done after the clay is partially cured and firm to the touch. Then add eyes, blush and other embellishments...such as child's name or some polka dots!
If you have trouble with the tail or ears staying on, just adhere with white glue!
Saturday, July 10, 2010
Tutorial: Garden bunny shelf sitters
Aren't these shelf sitters cute? Easy to make and great summer decoration.
Made with air-dry cold porcelain, using rope for legs and pushmold for tiny flowers. Embellished with mini garden tools and wire. Good beginner project! See tutorial at
http://www.creaclic.ch/fichescreatives/fiches2009/PAMlapinsjardiniers.php
Tutorial is in French. Google can translate
Tuesday, July 6, 2010
Spotlight on ADC Artist - Pat Lillich
See the step-by-step photos for creating the kitten shown in above photo (a WIP) on her blog: "In the Shadows" plus photos of other WIP sculpts. (Some good armature examples to see!)
In the "other pages" category you'll find a BJD tutorial for creating hands with jointed fingers using Paperclay. See more photos of her fantasy figures and BJD dolls in her website gallery.
Labels:
air-dry clay,
animal figures,
artist,
BJD,
cat,
fantasy,
paperclay,
tutorial
Monday, June 28, 2010
Hen and Chicks tutorial
Hi all, Sorry I've been MIA for over a month now and haven't posted any new tutorials or other clay news. Lots of things happening in real life have left no time for hobbies. One of them is arrival of new granddaughter! Cute as a button.
For your clay project today, how about making a memo board? This one may interest those of you with a country-rustic decor. Hen and chickens and raffia and gingham. Create a memo board using chicken wire...or make it a corkboard...which is what I would do! Then decorate with these cute chicks made from homemade cold porcelain. Memo board instructions.
Labels:
air-dry clay,
animal figures,
beginner,
cold porcelain,
crafts,
folk art,
homemade clay,
Porcelana Fria,
tutorial
Monday, March 8, 2010
Create This Delightful Bear
This cute bear was made with Delight air-dry clay following a tutorial from the makers of Creative Paperclay.
Delight clay is one of my favorites. It is extremely soft and easy to shape or mold. It holds its form while shaping and then air hardens to create an extraordinarily lightweight (about ½ the weight of Creative Paperclay) finished piece.
Water base paint can be kneaded into Delight to make an infinite range of colors with which to work. Of course, it can be colored with any kind of paint after it's dried. Note: When you add acrylic craft paint to tint the uncured clay, it will dry to a slightly lighter color.
This teddy bear tutorial is suitable for beginners....modeled with basic shapes, mostly teardrops!
Labels:
animal figures,
Delight,
paperclay,
teddy bear,
tutorial
Subscribe to:
Posts (Atom)