Friday, July 30, 2010

Make This Silly Yellow Bird


Is it a canary or is it a chicken?   LOL   I don't know but I think it's cute!   Good  project for beginning clay artist or something to make with the kids!

Thursday, July 29, 2010

Twitter, Facebook and the modern way!


I couldn't resist posting this fella's story ....if you're over 50, you'll relate...and get a good laugh!
 
 -------------------------------------------------------
A Twitter Tale.......

I signed up under duress for Twitter and Facebook, so my seven kids, their spouses, 13 grandkids and 2 great-grandkids could communicate with me in the modern way. I figured I could handle something as simple as Twitter with only 140 characters of space.

That was before one of my grandkids hooked me up for Tweeter, Tweetree, Twhirl, Twitterfon, Tweetie and Twittererific, Tweetdeck, Twitpix and something that sends every message to my cell phone and every other program within the texting world.

My phone was beeping every three minutes with the details of everything except the bowel movements of the entire next generation. I am not ready to live like this. I keep my cell phone in the garage in my golf bag.

The kids bought me a GPS for my last birthday because they say I get lost every now and then, going over to the grocery store or library. I keep that in a box under my tool bench with the Bluetooth phone 
[it's red] I am supposed to use when I drive. 

I wore it once and was standing in line at Barnes and Noble talking to my wife as everyone in the nearest 50 yards was glaring at me. Seems I have to take my hearing aid out to use it, and I got a little loud.

The GPS looked pretty smart on my dashboard, but the lady inside was the most annoying, rudest person I had run into in a long time. Every 10 minutes, she would sarcastically say, "Re-calc-u-la-ting".  You would think that she could be nicer. It was like she could barely tolerate me. She would let go with a deep sigh and then tell me to make a U-turn at the next light. Then when I would make a right turn instead, it was not good.

When I get really lost now, I call my wife and tell her the name of the cross streets and, while she is starting to develop the same tone as Gypsy, the GPS lady, at least she loves me.

To be perfectly frank, I am still trying to learn how to use the cordless phones in our house. We have had them for 5 years, but I still haven't figured out how I can lose 3 phones all at once and have to run around digging under chair cushions and checking bathrooms and the dirty laundry baskets when the phone rings.

The world is just getting too complex for me. They even mess me up every time I go to the grocery store. You would think they could settle on something themselves but this sudden "Paper or Plastic?" every time I check out just knocks me for a loop. I bought some of those cloth reusable bags to avoid looking confused, but I never remember to take them in with me.

Now I toss it back to them. When they ask me, "Paper or Plastic?" I just say, "Doesn't matter to me. I am bi-sacksual."  Then it's their turn to stare at me with a blank look.

I was recently asked if I tweet. I answered, "No, but I do toot a lot."

Then I thought about the business I ran for 30 years with 1800 employees, all without a Blackberry that played music, took videos and pictures and communicated with Facebook and Twitter. *sigh*

Tuesday, July 27, 2010

How to make a clay Hibiscus flower


This Hibiscus tutorial shows you how to make a Hibiscus flower with Hearty Clay.  Many other brands of air-dry clay would work, as well as cold porcelain.   A set of flower-shaping tools are recommended to make this flower but you might be able to substitute tools you already have.

This flower is a bit challenging to make and is probably not a good choice for your first clay flower!  ;-)  

Sunday, July 25, 2010

Learn how to make your own cold porcelain paste

Cold porcelain is a great air-dry clay that is very strong and durable when dry. Great for making flowers and small to large sculptures.  You can create your own cold porcelain paste at home from simple ingredients.  Here we have a clear, instructional video demonstration by our Yahoo Group member, Sangeeta, showing her easy microwave recipe (with the help of her son, the young, but talented producer, director and host of the video).  


There are many recipes for making cold porcelain paste being adapted according to the project to be made. This is just one of the recipes and relatively easy to accomplish.   Happens to be my favorite!!


For more information, please visit Sangeeta's website Everlasting Blooms or join our Air-Dry-Clay Yahoo Group.    Also see my other blog, Cold Porcelain Tutorials for more recipe options.

Friday, July 23, 2010

Sculptures by Allen & Patty Eckman


The stunningly detailed sculpture shown above and in the video below may only be made from paper - but they are being snapped up by art fans for equally stunning prices!


Husband and wife team Allen and Patty Eckman create clay molds and then put a specially formulated paper pulp into their molds and pressurize it to remove the water.   Allen explained their technique:  "It should not be confused with papier mache. The two mediums are completely different. I call what we do 'cast paper sculpture'."


The pieces depict traditional scenes from Native American history along with some wildlife vignettes and commissioned subjects.  The artists write:  ..."Some of them we create are lifesize and some we scale down to 1/6 lifesize" ...  sometimes taking up to 11 months to make each piece.  


In 1987 Allen Eckman stumbled onto cast paper as a fine art medium and instantly recognized the beauty and possibilities for creating high detail, strong, acid free, pure, fine art sculpture. It took the Eckmans many years to unlock the secrets to the medium. Discoveries included paper formulation, equipment and tool innovations and their unique paper processing methods.  You cannot get where Patty and Allen Eckman are by pulping cotton linters in your kitchen blender.
However!....if you're interested in trying this exciting new technique, you'll be glad to know you can purchase a booklet from Eckman Fine Art where you can see an overview of exactly how the artists create their work at a master level or buy one of their DIY kits "Patty's Flowers".  

Patty's Flowers are a series of beginning level products for creating beautiful life-size fine art cast paper sculpted flowers taught in the Eckman Method® program. They are the first level introduction to the Eckman Method.  Read more about these products at Eckman Fine Art.  

Also in development is the complete Eckman Method® Program in a dowloadable format.     The process taught through the Eckman Method® includes working with museum quality hand made Eckman paper and bonding agents, using casts from Eckman paper pulp, then altering and transforming them into finished works of art using Eckman techniques such as forms, templates, other casts and freehand sculpting with various hand made paper products and tools manufactured by Eckman Fine Art

Thursday, July 22, 2010

How to Make Cold Porcelain Chrysanthemums


Chrysanthemums come in many types and colors, but here is a good starter.   In this tutorial, Margaret shows you how to make a fairly simple white flower using cold porcelain paste.   Most any brand of air-dry clay could also be used to create these flowers.   Once you've made one, you could create a whole bouquet of different color mums!

http://www.celcrafts.co.uk/CelClub/TutorCPorcChrys.htm

Tuesday, July 20, 2010

How to make embellishments with ADC

Toodles and Binks shows us how to create embellishments with rubber stamps and air-dry clay for your scrapbooking project or some other clever project!  

Part 1


Part 2

Saturday, July 17, 2010

Gray's Anatomy online

The all time classic reference material for the human body used by artists and sculptors is online, free for you to use at bartleby.com.    The Bartleby.com edition of Gray’s Anatomy of the Human Body features 1,247 vibrant engravings—many in color—from the classic 1918 publication, as well as a subject index with 13,000 entries ranging from the Antrum of Highmore to the Zonule of Zinn.

Friday, July 16, 2010

Demo: Cold Porcelain Flowers

Here's a step-by-step demo for you to create some attractive yellow flowers with cold porcelain paste.  Pages are excerpts from the Spanish language "Biscuit" magazine.   No need to translate...the photos show each step clearly!
(click to enlarge)


These flowers could also be made with Deco Clay, Makin's Clay or just about any air-dry clay!

Sunday, July 11, 2010

Cold Porcelain Tips and Tricks

by Guest Author Kathryn Gray of Templewood Miniatures

Cold Porcelain paste is a lovely medium to work with.  It does not have to be oven baked as it air dries – depending on the air humidity,  it becomes completely dry between 2 – 3 hours.

Cold Porcelain can be rolled and worked  much finer than pastes which have to be oven baked.  It has a shrinkage rate of about 12%.

Cold Porcelain dries out very quickly and must always be wrapped tightly in cling film and then placed in a plastic bag which is then put into an airtight box when not being used.

It is important that a small quantity of white acrylic paint is added to the CP paste as you mix it - even if you intend to colour the paste -  or it will be translucent when it dries.  The semi-transparent characteristic of homemade Cold Porcelain is lovely if you want to make the aerial roots on orchids but not for anything else.  White should be done before any other colour is added.

It is advisable to lightly colour CP paste with your chosen colour before starting to work with it. You can colour up with acrylic paint, sugar paste colours or craft dust. Once coloured up, wrap well and leave for about half an hour for it to ‘rest’ before use.   Wrap colours separately in cling film, in order to avoid colour bleeding between the different pieces.

Do not colour up to much paste, as it does not keep as long once colour has been added.  Uncoloured paste will last up to a year if stored correctly as described above.

You will need very little paste for mini projects; a piece about the size of a thumbnail will make about 20 leaves.

Before starting a project rub dab your board, rolling pin and cutters with cornflour (corn starch) - this ensures that the cold porcelain does not stick to anything – do not over dust, just enough to stop sticking. Make and use the bag system described below.

It is important to have a corn flour "dusting" bag (corn starch) available.  I usually make this up by making a small bag with a piece of j-cloth, muslin or lint, put some powder into it and tie the top with a rubber band. Tools should be dabbed with this before use – it ensures that the paste does not stick – it does not get absorbed into the paste and can be dusted off when the paste is dry.

To work the CP paste, take a small amount of the coloured paste and roll out very thinly and use a cutter directly over the paste, if using a single cutter. The remainder of the paste must be gathered back  up and wrapped in cling film. Once the paste has been rolled out and exposed to air for a short while it will start to feel 'leathery',  you will not be able to roll it out and the best thing to do with it, is discard the piece and get a fresh piece – that is why it is important only to use a small amount at a time and keep the rest covered up.

To give shape to the cut pieces, either place on a veiner or use a balling tool on a petal pad.

If you are using a ball tool, make sure it is dabbed with powder and then gently run it around the edge of the petal (or whatever you have cut out)...this thins the edge and the whole item will look much thinner.  If you want to cup the leaf or petal to give it more shape, gently rub the ball tool in the middle and the edges will come up. Don’t worry, it won’t break – you can be quite tough with it.

If you cut out more than one leaf or petal at a time, it is advisable to cover the ones not being used, to prevent them drying out.  You can cover with a piece of acetate.  Make sure you dust the acetate with cornflour (corn starch) so that your cut items do not stick to it..

Wiring up leaves and petals can be completed in a number of ways.  The easiest is to glue the wire directly to the reverse of your piece using a small amount of PVA glue.  This gives a very thin profile to your piece of work. It is important to use a very small amount of glue.  The easiest way is to run the wire through glue first and stick this to the cold porcelain piece,  rather than add glue the work itself.  It is also much neater this way.  If you wish to add more colour your work, the colour will not take to the glue ... so any excess glue must be removed.

Wire is sold in different gauges and colours.  For miniature flowers, I use either 35g, 33g, 30g, 28g or 26g wire in paper coloured green. The higher numbers are the thinnest wires. For very fine work I use scientific paper covered wire on a roll.

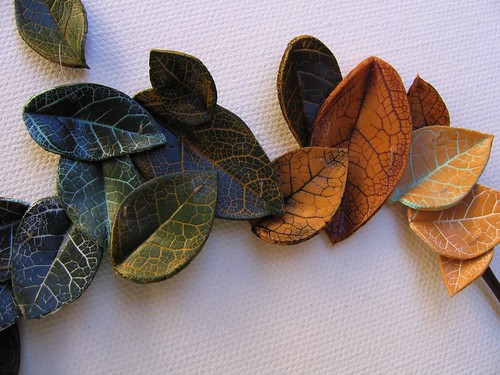
Leaves and petals look more ‘alive’ if they are dusted using either craft or sugar dust colours. These must be used very sparingly,  it is much better to remove most of the colour onto a piece of kitchen paper before you dust.  Too much colour, especially if of varying shades, can look dull and dirty.   More colour can always be added a little at a time.

Arrange your piece in your chosen container filled with either ‘soil’ made from:

  •  dried out, used teabags mixed with PVA glue (this shrinks when dried out, so fill the containers firmly), or 
  • ‘stay-soft’ (plasticine can be used as a substitute), or 
  • ‘dry’ oasis, or
  •  in clear containers, I put 'scenic water' as this enhances the reality effect.

Once your project is coloured, arranged and dried, it is best to spray it with a fixative. I usually spray it with matte varnish (satin can be used if you want a shine on the leaves).  Hair spray can be used as a substitute. Always make sure you spray outdoors.  Spraying with varnish sets the colours and seems to make them blend into each other and become more lifelike.  It also stops the coloured dust from rubbing off.


Kathryn Gray has been working in and teaching cold porcelain for over 20 years, firstly in full size and, for the last 15 years, also in miniature.   Shop at Templewood Miniatures for miniature laser cut house, furniture and flower kits  plus miniature clay cutters for flowers, etc.  Kathryn will be teaching cold porcelain classes at the Arnhem Miniature show (Netherlands) in October 2010 and  at the Tom Bishop miniature show (USA) next April 2011.

Saturday, July 10, 2010

Tutorial: Garden bunny shelf sitters


Aren't these shelf sitters cute?  Easy to make and great summer decoration.

Made with air-dry cold porcelain, using rope for legs and pushmold for tiny flowers.   Embellished with mini garden tools and wire.  Good beginner project!  See tutorial at
http://www.creaclic.ch/fichescreatives/fiches2009/PAMlapinsjardiniers.php

Tutorial is in French.   Google can translate 

Tuesday, July 6, 2010

Spotlight on ADC Artist - Pat Lillich


Pat Lillich describes her work as Figurative Art.   She creates a variety of fantasy figures...some that are part human, part animal.   Many of her figures are created with air-dry clay.   Pat is also known for her OOAK BJD dolls.


See the step-by-step photos for creating the kitten shown in above photo (a WIP)  on her blog:  "In the Shadows"  plus photos of other WIP sculpts.   (Some good armature examples to see!)

In the "other pages" category you'll find a BJD tutorial for creating hands with jointed fingers using Paperclay.    See more photos of her fantasy figures and  BJD dolls in her website gallery.

LinkWithin

Related Posts Plugin for WordPress, Blogger...